Photoshop Blend Modes Explained
How Blend Modes
Work
The Opacity slider
in the Layers Panel allows you to blend the active layer with the layers below
by making the active layer translucent, which in turn allow the layers below to
show through. The blend modes found in Photoshop allow the same process to take
place, but by using different mathematical calculations for each blend mode. As
of Photoshop CS5, there are 27 blend modes—2 new blend modes, Subtract and
Divide, where recently added. Any changes made using blend modes are
parametric, i.e., the changes are non-destructive, and you can always revisit
your blend mode settings and readjust them as needed withoutdamaging the pixels in your original image.
Blend Mode Groups
While the blend
mode names don’t make all that much sense, Adobe did group the blend modes into logical groups.
 Keyboard Shortcuts
The majority of
blend modes have keyboard shortcuts. To use these
shortcuts, your current tool must be something other than one of the tools
found in the painting and editing section of the Tools Panel (where the Brush
Tool, Healing Brush, Stamp, Eraser, etc. are found—see the illustration below). This is because the tools in the
painting and editing section have blend mode settings of their own, and if you
have one of these tools selected, their blend mode options will take precedence
over the blend mode options found in the Layers Panel. For example, if you use
Shift+Option+M to switch to the Multiply blend mode while you have the Paint
tool selected, the Paint tool’s blend mode will be changed to Multiply, not the
blend mode option in the Layers Panel. The good news is that these same blend
mode shortcuts DO work for the painting tools, you just need to pay attention
to what tool you have selected when you use the shortcuts.
 The Painting and Editing section of
the Tools Panel
The Painting and Editing section of
the Tools Panel
It’s also possible
to scroll up or down the blend mode list by using the keyboard combinations
Shift+ (scrolls down the blend mode list), or Shift- (scrolls up the blend mode
list). These keyboard shortcuts also work differently depending on what tool
you have selected in the Tools Panel. For example, if you have the Paint tool
selected and you use Shift+, the blend mode for the Paint tool will scroll down
to the next blend mode in the list (not the blend mode in the Layers Panel).
There are also
keyboard shortcuts for changing the Standard Opacity and Fill Opacity settings
in the Layers Panel. To use these shortcuts, your current tool must be
something other than one of the tools found in the painting and editing section
of the Tools Panel. To change the Standard Opacity using the keyboard, just hit
a number. For example, you can change the opacity to 50% by hitting the 5 key,
or change the opacity to 100% by hitting the 0 key. If you press the 0 key two
times quickly, you’ll change the opacity to 0%. You can even press two
different numbers in sequence. For example you can set the
opacity to 35% by pressing the 3 key quickly followed by the 5 key.
Adjusting the Fill
Opacity works using the same technique, but you need to use the Shift key when
hitting a number. For example, to set the Fill Opacity to 33%, use the keyboard
combination Shift+33. These keyboard shortcuts also work when one of the tools
in the painting and editing section of the Tools Panel is selected, however
once again, the blend mode settings for these tools take precedence over the
blend mode settings in the Layers Panel. For example, if you have the Paint
tool selected and you use the keyboard combination 22, the opacity for the
Paint tool will be changed to 22%. One thing to note is that there isn’t a Fill
Opacity setting for the any of the tools in the painting and editing section,
however, some of the tools do have a Flow setting (the Brush Tool for example).
For those tools that have a Flow setting, using Shift+number will change the Flow for the selected tool.
For example, if you use Shift+22 with the Paint tool selected, the Flow for the
Paint tool will be set to 22%.
 Blend Modes Keyboard Shortcuts
Commonly Used Blend
Modes
Some of the more commonly
used blend modes are Multiply, Screen, Overlay and Soft Light.
 Commonly Used Blend
Modes
Commonly Used Blend
Modes
Blend Mode
Opposites
Each of the blend
modes in the Darken group have an opposite (complementary) mode in the Lighten
group. These “opposites” use slightly different math to arrive at their
results, but the logic they use is similar but reversed. For example, with the
Darken blend mode, if the pixels on the active layer are darker than the ones
on the layers below, they are kept in the image. The opposite blend mode to
Darken is Lighten, and with the Lighten blend mode, if the pixels on the active
layer are lighter than the ones on the layers below, they are kept in the
image.
 Commuted Blend
Modes
Commuted Blend
Modes
There are 2 pairs of blend
modes that are commuted versions of each other. The first commuted pair is the
Overlay and Hard Light modes. The second pair is the Luminosity and Color
modes. When 2 blend modes are commuted versions of each other, if you apply one
blend mode to the active layer, you will get the same results if you add the
other (commuted) blend mode to the underlying layer, and then reverse the order
of the layers.
 The “Special 8” Blend Modes
There are 8 blend
modes that I’ll be referring to as the “Special 8.” These
blend modes behave differently when Fill Opacity is adjusted, compared to when
standard Opacity is adjusted. The blend modes that aren’t members of this Special 8 group react the same to both Fill and
Opacity changes (assuming there are no Layer Effects),
but with these Special 8 blend modes, 40%
Opacity will look different than 40% Fill, or 30% Opacity will look different
than 30% Fill, etc. For all of the other blend modes (the modes that aren’t
part of the Special 8), 40% Opacity looks the
same as 40% Fill, or 20% Opacity looks the same as 20% Fill, etc. This is an
important concept to understand, because it can extend the capabilities of
these blend modes. For example, the Hard Mix blend mode usually doesn’t look
all that great, but when you adjust the Fill Opacity for this mode, you can get
some great results. The blend modes that are members of this Special 8 group are Color Burn, Linear Burn, Color
Dodge, Linear Dodge (Add), Vivid Light, Linear Light, Hard Mix, and Difference.
 Blend Mode Math
Before I list the 27 blend
modes and how they work, you need to understand how the math in Photoshop
works. Because the blend modes work with brightness and darkness values, i.e.,
luminance levels, and because luminance levels appear as values from 0 to 255
in Photoshop (as seen with the Levels dialog box), you would assume that the
math Photoshop performs is based on these values. However, in the background,
Photoshop “standardizes” these luminance values before applying the math. When
these values are standardized, white (255) becomes 1, black (0) remains at 0,
and 50% gray becomes 0.5. All of the blend mode math takes place in the small
range between 0 and 1. It’s important that you understand this concept of
standardization, so you can understand the following mathematical equations.
 Because the
luminance values are standardized before the math is applied, and the math is
working with numbers ranging between 0 and 1, the resulting calculations may
not be what you would expect. For example, when working with numbers greater
than 1, division results in a smaller number, and multiplication results in a
larger number. However, when working with numbers between 0 and 1, division
results in a larger number, and multiplication results in a smaller number.
Subtraction and addition work pretty much as you would expect, weather you’re
working with numbers greater than 1, or values between 0 and 1.
Because the
luminance values are standardized before the math is applied, and the math is
working with numbers ranging between 0 and 1, the resulting calculations may
not be what you would expect. For example, when working with numbers greater
than 1, division results in a smaller number, and multiplication results in a
larger number. However, when working with numbers between 0 and 1, division
results in a larger number, and multiplication results in a smaller number.
Subtraction and addition work pretty much as you would expect, weather you’re
working with numbers greater than 1, or values between 0 and 1.
Below are some
examples using arbitrary numbers that show how the math results differ when
working with numbers between 0 and 1 versus numbers between 0 and 255. To help
you better understand the numeric values illustrated below, the regular
luminance number 200 is converted to a standardized number by using: 200 ÷ 255
= 0.78, and the regular number 72 is converted to a standardized number by
using: 72 ÷ 255 = 0.28.
Divide Example
|
Background layer ÷ Active layer =
Quotient
|
||
|
Regular Luminance Numbers:
|
200 ÷ 72 = 2.78
|
A darkening effect
|
|
Standardized Luminance Numbers:
|
0.78 ÷ 0.28 = 2.78
|
A brightening effect where whites
are blown-out
|
Multiply Example
|
Background layer × Active layer =
Product
|
||
|
Regular Luminance Numbers:
|
200 × 72 = 14,400
|
A brightening effect where the
whites are extremely blown-out
|
|
Standardized Luminance Numbers:
|
0.78 × 0.28 = 0.22
|
A darkening effect
|
Addition Example
|
Background layer + Active layer =
Sum
|
||
|
Regular Luminance Numbers:
|
200 + 72 = 272
|
A brightening effect where the
whites are slightly blown-out
|
|
Standardized Luminance Numbers:
|
0.78 + 0.28 = 1.06
|
A brightening effect where the
whites are slightly blown-out
|
Subtraction Example
|
Background layer − Active layer =
Difference
|
||
|
Regular Luminance Numbers:
|
200 − 72 = 128
|
A darkening effect & mid-tone
(50%) gray
|
|
Standardized Luminance Numbers:
|
0.78 − 0.28 = 0.5
|
A darkening effect & mid-tone
(50%) gray
|
Blend Mode Math
Examples
A = Active Layer
B = Background Layer (i.e., the underlying layers)
*In the equations below, 1−X = the luminance level “X” is Inverted
B = Background Layer (i.e., the underlying layers)
*In the equations below, 1−X = the luminance level “X” is Inverted
Darken Modes Math
|
Blend Mode
|
Equation
|
Description
|
|
Multiply
|
A×B
|
A multiplied by B
|
|
Color Burn
|
1−(1−B)÷A
|
B inverted divided by A, and the
quotient is then inverted
|
|
Linear Burn
|
A+B−1
|
A plus B, then white is subtracted
from the sum (an inversion)
|
Lighten Modes Math
|
Blend Mode
|
Equation
|
Description
|
|
Screen
|
1−(1−A)×(1−B)
|
A inverted multiplied by B
inverted, and the product is inverted
|
|
Color Dodge
|
B÷(1−A)
|
B divided by A inverted
|
|
Linear Dodge
|
A+B
|
A plus B
|
Cancellation Modes
Math
|
Blend Mode
|
Equation
|
Description
|
|
Subtract
|
B−A
|
B minus A
|
|
Divide
|
B÷A
|
B divided by A
|
Blend Mode
Descriptions
|
BLEND MODE
|
DESCRIPTION
|
|
NORMAL GROUP
|
|
|
Normal
|
The normal mode where no math is
applied.
|
|
Dissolve
|
The Dissolve blend mode on acts on
transparent and partially transparent pixels – it treats transparency as a
pixel pattern and applies a diffusion dither pattern.
|
|
DARKEN GROUP
|
|
|
Darken
|
If the pixels of the selected layer
are darker then the ones on the layers below, they are kept in the image. If
the pixels in the layer are lighter, they are replaced with the tones on the
layers below (they show through to the selected layer), so basically the
darker tones of all layers are kept. Note that this behavior is on a channel
by channel basis, i.e., this rule is applied to each of the 3 RGB color
channels separately. If you want to apply the same Darken blend mode behavior
on a composite basis, use the Darker Color blend mode instead (however this
typically results in harsher transitions).
|
|
Multiply
|
The best mode for darkening. Works
by multiplying the luminance levels of the current layer’s pixels with the
pixels in the layers below. Great for creating shadows and removing whites
and other light colors (while keeping the darker colors). As an analogy,
think of the selected layer and all of the layers below as individual
transparencies, and that they are stacked on top of each other, and then
placed on an overhead projector. Using this analogy, the light passing
through the lighter areas will have trouble getting through the darker areas,
but the lighter areas will shine through other lighter areas with relative
ease. If the Multiply blend mode isn’t dark enough for what you’re working
on, try the Linear Burn or Color Burn modes. Math:
A×B (Active Layer multiplied by Background
Layer).
|
|
Color Burn (Special 8)
|
Darker than Multiply, with more
highly saturated mid-tones and reduced highlights. This is one of the
“Special 8” that I mentioned earlier, where Fill and Opacity behave
differently.Math: 1−(1−B)÷A (Background Layer inverted,
divided by Active Layer, and the quotient is then inverted).
|
|
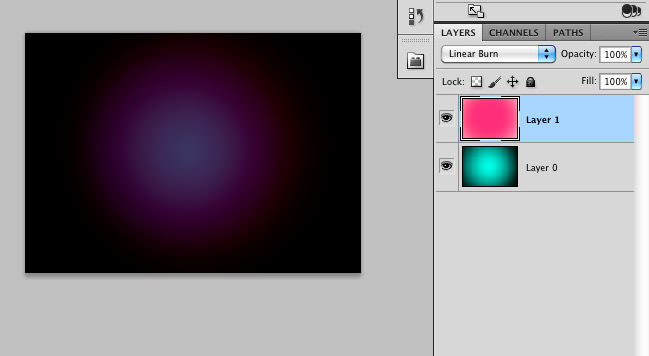
Linear Burn (Special 8)
|
Darker than Multiply, but less
saturated than Color Burn. This is one of the “Special 8” that I mentioned
earlier, where Fill and Opacity behave differently. Math: A+B−1 (Active Layer plus Background Layer,
then white is subtracted from the sum (an inversion).
|
|
Darker Color
|
Similar to the Darken blend mode,
but darkens on the composite channel, instead of separate RGB color channels.
|
|
LIGHTEN GROUP
|
|
|
Lighten
|
If the pixels of the selected layer
are lighter then the ones on the layers below, they are kept in the image
(the opposite of the Darken blend mode). If the pixels in the layer are
darker, they are replaced with the pixels on the layers below (they show through
to the selected layer). Note that this behavior is on a channel by channel
basis, i.e., this rule is applied to each of the 3 RGB color channels
separately. If you want to apply the same Lighten blend mode behavior on a
composite basis, use the Lighter Color blend mode instead (however this
typically results in harsher transitions).
|
|
Screen
|
Similar to the Lighten blend mode,
but brighter and removes more of the dark pixels, and results in smoother
transitions. Works somewhat like the Multiply blend mode, in that it
multiplies the light pixels (instead of the dark pixels like the Multiply
blend mode does). As an analogy, imagine the selected layer and each of the
underlying layers as being 35mm slides, and each slide being placed in a
separate projector (one slide for each projector), then all of the projectors
are turned on and pointed at the same projector screen…this is the effect of
the Screen blend mode. This is a great mode for making blacks disappear while
keeping the whites, and for making glow effects. Math: 1−(1−A)×(1−B) (A inverted multiplied by B
inverted, and the product is inverted).
|
|
Color Dodge (Special 8)
|
Brighter than the Screen blend
mode. Results in an intense, contrasty color-typically results in saturated
mid-tones and blown highlights. Math: B÷(1−A) (B
divided by A inverted).
|
|
Linear Dodge (Add) (Special 8)
|
Brighter than the Color Dodge blend
mode, but less saturated and intense. This mode “Adds” the luminance levels. Math: A+B (A plus B).
|
|
Lighter Color
|
Similar to the Lighten blend mode,
but lightens on the composite channel, instead of separate color channels.
Compares each pixel and gives you the lighter of the two (and usually results
in harsher transitions).
|
|
CONTRAST GROUP
|
|
|
General Notes
|
All of the Contrast modes work by
lightening the lightest pixels, darkening the darkest pixels, and dropping
the gray mid-tones (50% gray). This is achieved by using combinations of the
lightening and darkening modes from the Lighten and Darken groups. The
Contrast blend modes work by checking if the colors are either darker than
medium gray, or lighter than medium gray. If they are darker then medium
gray, then a darkening blend mode is applied. Conversely, if the colors are
brighter then medium gray, then a brightening mode is applied. The mid-point
(50% gray), is dropped. For each of the Contrast blend modes, the math is
applied against complementary (opposite) blend modes. For example, the
Overlay blend mode uses a combination of the Multiply and Screen Blend modes,
and these modes are complements of each other. The other complementary blend
modes are: Darken/Lighten, Color Burn/Color Dodge, Linear Burn/Linear Dodge
(Add), Darker Color /Lighter Color.
|
|
Overlay
|
Uses a combination of the Screen
blend mode on the lighter pixels, and the Multiply blend mode on the darker
pixels. It uses a half-strength application of these modes, and the mid-tones
(50% gray) becomes transparent. One difference between the Overlay blend mode
and the other Contrast blend modes, is that it makes its calculations based
on the brightness of the layers below the active layer—all of the other
Contrast modes make their calculations based on the brightness of the active
layer. To get results similar to the Overlay mode, but where the blend mode
favors the active layer, use the Hard Light blend mode (it uses similar
logic, but favors the active layer). Another thing to note about the Overlay
blend mode, is that it and the Hard Light blend mode are commuted versions of
each other. This means that if you apply the Overlay blend mode to the active
layer, you will get the same effect if you apply the Hard Light blend mode to
the layer below, and then switch the order of the layers.
|
|
Soft Light
|
Uses a combination of the Screen
blend mode on the lighter pixels, and the Multiply blend mode on the darker
pixels (a half-strength application of both modes). Similar to the Overlay
blend mode, but results in a more organic effect that is softer—results in
somewhat transparent highlights and shadows.
|
|
Hard Light
|
Uses a combination of the Linear
Dodge blend mode on the lighter pixels, and the Linear Burn blend mode on the
darker pixels. It uses a half-strength application of these modes, and logic
similar to the Overlay blend mode, but favors the active layer, as opposed to
the underlying layers. The effect is more intense than the Overlay blend
mode, and results in harsher light. Another thing to note about the Hard
Light blend mode, is that it and the Overlay blend mode are commuted versions
of each other. This means that if you apply the Hard Light blend mode to the
active layer, you will get the same effect if you apply the Overlay blend
mode to the layer below, and then switch the order of the layers.
|
|
Vivid Light (Special 8)
|
Uses a combination of the Color
Dodge Mode on the lighter pixels, and the Color Burn blend mode on the darker
pixels (a half-strength application of both modes). Similar to the Hard Mix
blend mode in overdrive, and typically results in a more extreme effect.
|
|
Linear Light (Special 8)
|
Uses a combination of the Linear
Dodge blend mode on the lighter pixels, and the Linear Burn blend mode on the
darker pixels (a half-strength application of both modes). Similar to the
Vivid Light blend mode in overdrive, and typically results in a more extreme
effect.
|
|
Pin Light
|
Uses a combination of the Lighten
blend mode on the lighter pixels, and the Darken blend mode on the darker
pixels (a half-strength application of both modes). If the dark pixels on the
active layer are darker than the dark pixels on the underlying layers, they
will be visible, if they aren’t, they drop away. If the pixels on the active
layer are lighter than the pixels on the underlying layers, they will also be
visible, if they aren’t, they drop away. This is a wild blend mode that can
result in patches or blotches (large noise), and it completely removes all
mid-tones.
|
|
Hard Mix (Special 8)
|
Uses the Linear Light blend mode
set to a threshold, so for each RGB color channel, pixels in each channel are
converted to either all black or all white. Once the math is applied to each
separate channel, and the composite channel is created, the resulting
composite can contain up to 8 colors: Red, Green, Blue, Cyan, Magenta,
Yellow, Black and White. Note that this mode is a member of the “Special 8″
blend modes, and it reacts differently to Fill Opacity than it does to
Standard Opacity. If you reduce the Fill Opacity when using this mode, the
number of colors in the image will increase beyond the previously mentioned 8
colors. This can be considered another one of the extreme blends modes, but
adjusting the Fill Opacity, the effect can be tempered and great results can
be attained.
|
|
INVERSION GROUP
|
|
|
Difference (Special 8)
|
Subtracts a pixel on the active
layer, from an equivalent pixel in the composite view of the underlying
layers (B-A), and results in only absolute numbers (the subtraction never produces
a negative number—if it turns out to be a negative number, it’s converted
into a positive number). It does a selective inversion where black never gets
inverted, white inverts absolutely, and all of the other luminance levels
invert based on their brightness on a channel-by-channel basis. With this
blend mode, similar colors cancel each
other, and the resulting color is black.
|
|
Exclusion
|
Subtracts a pixel on the active
layer, from an equivalent pixel in the composite view of the underlying
layers (B-A), and results in only absolute numbers (the subtraction never
produces a negative number). It does a selective inversion where black never
gets inverted, white inverts absolutely, and all of the other luminance
levels invert based on their brightness on a channel-by-channel basis. With
this blend mode, similar colors cancel each other, and the resulting color is
gray. This mode is basically the same as the Difference blend mode, except
when similar colors cancel each other, the resulting color is gray instead of
black.
|
|
CANCELLATION GROUP
|
|
|
Subtract
|
Subtracts a pixel on the active
layer, from an equivalent pixel in the composite view of the underlying
layers (B-A). Similar to the Difference mode, but doesn’t convert the whites
to an absolute number. Blacks don’t change any colors (because black = 0, and
AnyColor – 0 = AnyColor), and whites drop out to blacks (because whites are
such a large number, and all of the other numbers will be less than whites,
so the resulting color will always be black). With this blend mode, similar
colors cancel each other, and the resulting color is black. Math: B−A (B minus A).
|
|
Divide
|
Divides a pixel on the active
layer, from an equivalent pixel in the underlying layers on a channel by
channel basis (B÷A). This mode typically results in extreme highlights
because dividing the “standardized” luminance numbers results in a larger
number. Whites don’t change any colors (because white = 1, and AnyColor÷1 =
AnyColor). Similar colors turn white (because AnyColor÷Anycolor = 1), with
the exception of blacks, which stay black (because 0÷0 = 0). Math: B÷A (B divided by A).
|
|
COMPONENT GROUP
|
|
|
Hue
|
Keeps the Hue of the active layer,
and blends the luminance and saturation of the underlying layers (you
basically get the image from the lower layer with the colors of the top
layer).
|
|
Saturation
|
Keeps the saturation of the active
layer, and blends the luminosity and hue from the underlying layers—where
colors from the active layer are saturated, they will appear using the
luminosity and hue from the underlying layers.
|
|
Color
|
Keeps the color of the active
layer, and blends the hue and saturation (the color) of the active layer with
the luminance of the lower layers (a handy way to change the color of an
image). Another thing to note about the Color blend mode, is that it and the
Luminosity blend mode are commuted versions of each other. This means that if
you apply the Color blend mode to the active layer, you will get the same
effect if you apply the Luminosity blend mode to the layer below, and then
switch the order of the layers.
|
|
Luminosity
|
Keeps the luminance of the active
layer, and blends it with hue and saturation (the color) of the composite
view of the layers below. This results in the colors of the underlying layers
being blended with the active layer, and replacing them. Another thing to
note about the Luminosity blend mode, is that it and the Color blend mode are
commuted versions of each other. This means that if you apply the Color blend
mode to the active layer, you will get the same effect if you apply the
Luminosity blend mode to the layer below, and then switch the order of the
layers.
|
Additional Blend
Mode Math Tips
When using the
Linear Burn mode, you can achieve the same results by applying the Subtract
mode with a couple of changes. For example, if you have 2 layers, and the top
active layer is set to the Linear Burn mode, apply the Subtract mode to the top
layer, apply an invert layer, and then apply a clipping mask. To put it another
way, subtracting an inverted layer produces the same effect as not inverting
the layer, and applying the Linear Burn mode. This works because the equation
for the Subtraction mode is B−A, and the equation for inverting the active
layer and applying the Subtract mode is: B−(1−A). If you look at the math,
you’ll see that it’s the same as the Linear Burn mode equation: A+B−1. This can
be see by the following equation:
|
Linear Burn
|
Subtract with Inversion
|
|
|
A+B−1
|
=
|
B−(1−A)
|
To explain how
B−(1−A) is the same as A+B−1, the minus mi

 The same logic and
relationship applies to the Color Dodge blend mode and the Divide blend mode.
Inverting the active layer, applying a clipping mask, and then applying the
Divide mode is equivalent to the Color Dodge mode without the inversion. For
example, the equation for the Color Dodge mode is: B÷(1−A), and the equation
for the Divide mode is: B÷A, so if you invert the Divide mode you get the following
equivalence:
The same logic and
relationship applies to the Color Dodge blend mode and the Divide blend mode.
Inverting the active layer, applying a clipping mask, and then applying the
Divide mode is equivalent to the Color Dodge mode without the inversion. For
example, the equation for the Color Dodge mode is: B÷(1−A), and the equation
for the Divide mode is: B÷A, so if you invert the Divide mode you get the following
equivalence:
Comments
Post a Comment